- TED : Jason Fried: Why work doesn't happen at work - warto poświęcić te 15 minut i posłuchać gościa, bo kapitalnie uświadamia
- New Tools for the New Year: Lifestyle
- The 100 Best Lifehacks of 2011: The Year in Review - kopalnia wiedzy po prostu :)
- Is IT Becoming Obsolete ?
- youneedabudget.com - bardzo ciekawy kawałek software'u, jeśli masz problem z układanim wydatków, to ten software tego też uczy
- Microsoft Rush-Releases Update for Critical Windows Bugs
- Za dużo otwartych kart w Chrome? Uśpij je!
- OMEGA Seamaster PLANET OCEAN Cal. 8500
- OMEGA Seamaster PLANET OCEAN Titanium Liquidmetal Chrono Cal.9300
- Imaginación al poder
- Jerseys navidad - sweterki z reniferem to pestka przy tych
- Calendario de Ingate - oryginalny pomysł na kalendarz
- Honda destruye más de mil vehículos dañados por las inundaciones en Tailandia - a przecież u nas spokojnie by jeździły
- The U.S. Budget Made Easy na przykładzie budżetu USA genialnie prosto pokazany mechanizm ile zarabiamy, ile wydajemy itp
- 16 Universal Laws - faktycznie, to tak działa jak napisali :)
- During World War II the Army Corps of Engineers needed to hide the Lockheed Burbank Aircraft Plant - niesamowity przykład kamuflażu z 1940 roku
- Restoring your faith in Vampire movies: Let The Right One In - a tu nie będę zachęcał, trzeba samemu ocenić
- How the feds are tracking your kid - nie sądziłem, że kiedykolwiek taki scenariusz się ziści, to jak rok 1984 Orwella na żywo
- SOPA is the end of us, say bloggers - czyli w USA już wkrótce będzie można na podstawie ustawy antypirackiej zakazać publikacji dowolnej treści a wyszukiwarki nie będą miały prawa pokazywać tego w wynikach
- Santa Claus Arrested Following Joint Investigation by IRS, INS, and FWS - to co prawda żart ale oparty na już istniejącym lub będącym w zatwierdzeniu w USA prawodastwie
- What do people do on New Years Eve? What’s the most common New Years Resolution?
- The Most Hilarious Web Comic Strips of 2011 (60 pics)
- Ron Paul: I Wouldn't Risk US Troops to Stop the Holocaust
- The 22 Sexiest Calendars of 2012 - nadal tego nie rozumiem, na kalendarze dają kobiety o obfitych kształtach ale modelki na wybiegach wyglądają jakby uciekły z obozu dla uchodźców z Darfuru
- The Most Important Graphs of 2011
- The 10 Most Important Things They Didn't Teach You In School
Saturday, December 31, 2011
Przegląd prasy, czyli ciekawostki czytelnicze 20
Tuesday, December 27, 2011
Teraz wszystko jasne

via: imgspark.com
Przegląd prasy, czyli ciekawostki czytelnicze 19
- How Coffee Can Galvanize Your Workout - o bardzo ciekawym wpływie kawy na ćwiczenia
- Carryology : Head to Head - Backpack vs Messenger
- If backs bend, then why are packs flat ?
- Hip Pouch - czyli fajnie skonstruowana torba na pasek przydatna np. do jazdy na rowerze
- 7 Things Highly Productive People Do - artykuł, który zaczyna się tak : "You probably don’t want to admit it but you love distractions"
- Contortionist folding bike by Dominic Hargreaves - kapitalna konstrukcja, rower tak składany, że aż nie do wiary
- Wood Whale czyli zrób sobie sam wielorybka na ołówki :)
- Girl/Jeep wallpaper :)
- Don’t Say It: How to Get “Can’t” Out of Your Vocabulary - czyli trochę o tym, jak mówienie, że czegoś sie nie da, ma destrukcyjny wpływ na to co robimy
- 12 Tips For Beating the Social Overeating Habit - czyli jak się nie przejadać
- ASUS Sued over Transformer Prime Tablet - taka ciekawostka ze świata technologii, jak to niektórym wydaje się, że można zastrzec kombinację w miarę potocznych wyrazów
- Study: People Lie More Over Text Messages - a to ci dopiero nowość
- Flickr: making of FIX UP 2012 calendar
- Ostatni Mohikanie, czyli jak nie spaść z siodełka - parę rozsądnych słów o jeździe rowerem w warunkach zimowych
I po Świętach, czyli facepalm roku

via: soberinanightclub.com
Ale jak uciec od wszechogarniającego nas kapitalizmu ? Czy naprawdę nie ma już żadnej świętości, skoro w kościele jest szopka na kasę i jak wrzucisz monetę to Maryja huśta kołyską ?
Błagam ... jaki my świat budujemy dla naszych dzieci ? Gdzie i jak od tego uciec ?
Monday, December 26, 2011
Thursday, December 22, 2011
Przegląd prasy, czyli ciekawostki czytelnicze 18
- Backpack vs Messenger - i w końcu ktoś napisał to, co ja powtarzałem od zawsze - komora na sztywnego laptopa nie może być przy plecach, bo inaczej torba nie układa się naturalnie
- The Melanie Iglesias Flip Book: Part 4 "Christmas Edition" - takie "snieżynki" to gorąco popieram :)
- The Pirate Bay Gives No Fucks About US Law
- Medytacja i joga – ocalą ci życie na Mount Evereście ?
- Life's Extremes: Pathological Liar vs. Straight Shooter
- Charge your iPod with your bike - to ja teraz poproszę takie coś z wtyczką dla USB
- Matheus Lopes Castro Illustration
- Spiral Burner Cooktop - kapitalna kuchenka gazowa :) aż szkoda, że nie sprzedawali takich jak budowałem dom
- 5 rzeczy, których ludzie żałują w chwili śmierci - pracownica hospicjum spisała najczęściej powtarzające się wyznania osób
- The 9 Types Of Orgasms
- Dilbert : 2011-12-21 - czyli coś o motywowaniu pracowników
- Prawdziwe życie nałogowego gracza komputerowego - może niektórzy skoro nie widzą tego u siebie, jak zobaczą u innych, to się ockną ?
- Świąteczne swiatełka na domu (konkretnie 56000 ledów)
- Scientists create first solar cell with over 100 percent quantum efficiency"> - jak koncerny paliwowe nie udupią tego wynalazku, to mam nadzieję, że wkrótce zobaczymy solary zdolne do dostarczania całego domu w sensownej cenie
- The Stupid Things You Do When Dating (and How to Fix Them)
- Window for your fence - ciekawy pomysł swoją drogą
- Tech Tips - 13 Reasons why Netbooks trump Slates
- The Ivy-Bridge processors will remain expensive
- How to Defend from Keyloggers in Firefox with Keystroke Encryption
- How To Downgrade Firefox Add-ons
- Google Developing Glasses with Built-in Display and GPS
- Acer Aspire S3 (320GB HDD) Review
- Hands-on Ultrabook Keyboards
- Anandtech benchmark comparison
- Overclockers Club : Corsair Force GT SATA 6Gb/s 120GB Review
- Reviews of Corsair 2.5 inch Force GT Series
- Corsair Force GT 120 GB Solid State Drive (IT)
- Corsair Force GT 120GB SSD Review
- HP Pavilion dm4t with Beats Audio for $735
- Win 7 : Support and Q&A for Solid-State Drives
i trochę na temat Oracle Applications
- Oracle Applications Cloning Process
- APPS Issue: >> FRM-92050 Failed to connect to the server
- Thread: Relinking forms executable in 11.5.10.2
- What are ADPATCH Utility Tables
- How to change Oracle Applications R12 Port
- Giving In To The Urge To Purge (PDF)
- FND_ENV_CONTEXT Growing Very Large In Applications 11i
- Purge Concurrent Request and/or Manager Data
- Best Practices for Performance for Concurrent Managers in E-Business Suite
- How to check if symlink exists
- ls options: accept stdin, and list files except for
Magia świąt

via: remekdabrowski.blox.pl
Wednesday, December 21, 2011
Tuesday, December 20, 2011
Monday, December 19, 2011
Słuchawki z redukcją szumów Omnitronic NCH-1000 recenzja / opinie
Dotychczas moim modelem EDC były douszne słuchawki Sony. Jednak niezależnie od tego jakbym głęboko ich w ucho nie wpychał i jak głośno nie nastawiał, zupełnie nie sprawdzały się w lokalizacjach z wysokim natężeniem wszelakich dźwięków obcych. W środkach komunikacji miejskiej, czy w trakcie spacerów po zatłoczonych warszawskich ulicach porażka na całej linii. Poza tym takie ryczące słuchawki przestawały mieć cokolwiek wspólnego z dostarczaniem pozytywnych wrażeń muzycznych. Zdałem sobie sprawę, że czas poszukać czegoś lepszego.
Poszukiwania rozpocząłem od przejrzenia iluś tam stron w internecie powiązanych z tym tematem. Natrafiłem tam na dość ciekawie zapowiadający się koncept aktywnej redukcji szumów. Krótko mówiąc słuchawki mają wbudowany własny mikrofon, który wyłapuje dźwięki tła i dodatkowo do przekazywanej muzyki generuje dźwięki w przeciw fazie, co w efekcie dla słuchacza skutkuje "wyciszeniem" dźwięków z zewnątrz. Skutecznie zostałem jednak "ostudzony" z mojego entuzjazmu, bo przejrzenie cenników udowodniło, że znane ze skuteczności rozwiązania "wiodących" markowych producentów cenowo pozostają daleko poza założonym przeze mnie limitem. Skupiłem się więc na rozwiązaniach mniej markowych. Tak trafiłem na salon LFX z Warszawy i wystawiane przez nich na allegro słuchawki z redukcją szumów firmy Omnitronic NCH-1000. O firmie Omnitronic w życiu nie słyszałem. Do tego biorąc pod uwagę, że "markowe" słuchawki kosztowały 500 PLN, lub więcej, zaś NCH-1000 były wystawione za 125 PLN, to nie spodziewałem się jakiegoś szału. Zdrowa chłopska ciekawość nakazała mi jednak wizytę w salonie i przekonanie się na własne uszy, jak się sprawy mają faktycznie.
No i powiem tak: po założeniu słuchawek i włączeniu redukcji, układ redukujący praktycznie kompletnie wyciszył rozmowę pomiędzy dwojgiem pracowników stojących jakieś 1,5 metra ode mnie. Zaliczyłem opad kopary. Jeśli taka jest skuteczność tego rozwiązania, przy tej cenie, to nie wiem jakie cuda muszą odstawiać słuchawki za 3 x taką kwotę ?
W efekcie wyszedłem ze sklepu z tymi słuchawkami. Firma LFX w której kupowałem, mieści się w Warszawie przy Alei Jana Pawła II - dla nieznających Warszawy dodam, że jest to jedna z głównych tras wiodących przez centrum Warszawy o bardzo dużym natężeniu ruchu w godzinach szczytowych. Zaobserwowałem, ze w warunkach ulicznych - układ redukujący sprawował się trochę gorzej niż w salonie, w sensie takim, że nie "wyrzynał" kompletnie odgłosów ruchu ulicznego, natomiast dość znacznie w moim odczuciu redukował jego poziom. Stojąc na skrzyżowaniu Alei Solidarności (druga taka istotna arteria komunikacyjna dla Warszawy) ze wspomnianą już Aleją Jana Pawła, byłem w stanie bez problemu słuchać Adele, opery, czy koncertów fortepianowych. Owszem, musiałem trochę przygłośnić muzykę, lecz jej odbiór był nadal komfortowy.
Co do jazdy pociągami powiem, że jest dobrze lub nawet lepiej niż dobrze. Chodzi o to, że aktywna redukcja działa dość specyficznie : lepiej dla tonów niskich, gorzej dla wysokich i jak miałem okazję sprawdzić, poszczególne składy pociągów różnią się generowanym odgłosem jazdy w zależności od producenta :) Gorsza praca układu redukcji w zakresie tonów wysokich oznacza, że jeśli usiądziesz na wprost dwóch przekup, które falsecikiem piszczą do siebie najnowsze ploty (patrz Dzień Świra), to niestety nadal będzie je trochę słychać. To samo dotyczy się małych szczekliwych piesków biegających za płotami przydrożnych posesji. Co ciekawe większe psy (np. wilczury) są dużo lepiej odfiltrowywane przez układ, czyli słabiej je słychać przez muzykę.
Odkąd słuchawki kupiłem nie miałem okazji lecieć samolotem, to się nie wypowiem na temat skuteczności redukcji w takich warunkach. Podejrzewam jednak, że powinno być OK, a przynajmniej do momentu, w którym gdzieś obok nie usiądzie jakaś paniusia z noworodkiem wrzeszczącym przez cały kilkugodzinny lot*
Mogę dodać, że słuchawki dają sobie całkiem dobrze radę w trakcie odkurzania całego domu 1000 watowym odkurzaczem. Z racji tego, że odkurzacz pracuje ciszej lub głośniej w zależności od tego, z jakiej powierzchni zasysa powietrze i jak bardzo jest przytkany, myślę, że mogę porównać działanie słuchawek w trakcie sprzątania do ich pracy przy ruchliwym skrzyżowaniu. Jest nieźle ale jednak trzeba trochę przygłośnić muzykę.
Generalnie podsumowując tą recenzję, słuchawki Omnitronic NCH-1000 polecam jako fajne budżetowe rozwiązanie dla nałogowych słuchaczy codziennych.
* - autentyczne, sam przeżyłem
Przegląd prasy, czyli ciekawostki czytelnicze 17
- Sony NEX-7 In-Depth Review (dpreview.com)
- tomohiro tanaka architect atelier: cabin-et house
- Using a very basic social engineering tactic, it’s possible to get just about anyone to “friend” you on Facebook
- Lenovo ThinkPad Edge 13 review
- Confederate Hellcat X132 - the toughest motorcycle ever made
- HP Folio 13-1008TU Ultrabook (pcworld)
- Complete and unequivocal guide to success
- ThinkPad X series wikipedia
- Netbook Megathread IV - Pick One: Graphics vs Dual-Core vs Battery Life
- E-450, Atom N2800, N570 benchmarked
- NVELO Dataplex SSD Caching Software Review – Seven mSATA SSDs Prove An Amazing Concept
- Toshiba Portege Z830 13.3” Ultrabook Laptop Review – Toshiba Creates One Amazing SSD Ultrabook!
- Anvil Storage Utilities Releases New Storage and SSD Benchmark
- Recenzja słuchawek Creative Aurvana Live!
- Słuchawki wysokiego lotu
- Sprzęt słuchawkowy na początek
- Co po CAL ?
- Ortodynamiczny świat
- Turn a Pair of $30 Headphones into a $300 Pair
- DIY HiFi Orthodynamic Portable Headphones (aka Ribbon Driver Headphones)
- DIY Dry Erase Tabletop Turns Any Table Into a Polished Whiteboard
- Koss PortaPro - Headphones ( semi-open ) Reviews
- Koss PortaPro Headphones Reviews
- HP Pavilion dm1-4010us (Late 2011) Review
- SLR Magic 23 1.7 Hyperprime vs Zeiss 24 1.8 Sonnar on the NEX-7
- Review: Think Thank Photo Retrospective 10 - bardzo ciekawa torba fotograficzna
- Removing Bloatware, reinstall Win 7
- Spisek żarówkowy - nieznana historia zaplanowanej nieprzydatności
- Polyphasic Sleep Cycles Trick Your Body into Needing Less Sleep
- HTTP status cats by GirlieMac: classic server error codes, now with cats
- The Incredible New Soluto Painlessly Fixes Your Friends’ Computers from Afar
- The Cheapskate’s Guide to Getting Free Dropbox Space
- Dilbert by Scott Adams : December 8, 2011
- Damn accurate chart of the many problems faced by men living in the modern society
- 10 Incredibly Bizarre Death Statistics
- Swiateczna dekoracja domku z 25000 diód
Thursday, December 15, 2011
Tuesday, December 13, 2011
Przegląd prasy, czyli ciekawostki czytelnicze 16
- Niewspierane Radeony – raport z placu boju
- Ciekawe czarno-białe akty
- DPP 3.10 for Win & Mac
- The Big Picture: Pearl Harbor 70th anniversary
- Steve Huff Mirrorless Central – The page with ALL things Mirrorless
- Here Is the List of Future Ivy-Bridge Mobile CPUs
- Spisek żarówkowy - nieznana historia zaplanowanej nieprzydatności
- YT : Her Morning Elegance - Oren Lavie
- Bonita colección de los rostros del mundo
- The 45 most powerful images of 2011
- Niebanalne reklamy
13 grudnia
Monday, December 12, 2011
Tuesday, December 6, 2011
Przegląd prasy, czyli ciekawostki czytelnicze 15
- You Could Use A Sweet Motivational Speech In Your Life: Earl Nightingale’s The Strangest Secret
- Your Insightful 1 Minute Read Of The Day: The Fisherman And The Businessman
- Seat Savers czyli genialny pomysł żeby nikt cię nie podsiadł
- 20 Creative McDonalds Ads
- Passport and Reality
- Pohutukawa Beach House by Herbst Architects
- Hot illustrations by Serge Birault
- Marta Penter Realistic Paintings
- Wedding Wows!
- Fish Day Ted Sabarese
- Best photos of the year 2011
Student dżdżownica na zakupach
Monday, December 5, 2011
Przegląd prasy, czyli ciekawostki czytelnicze 14
- How I Use Robot Mode and Non-Digital Creativity to Accomplish More in the Day
- The Stupid Things You Do When Shopping (and How to Fix Them) - zwłaszcza w nadchodzącym szale świątecznych zakupów warto przeczytać i się stosować :)
- Tips For Setting Up An All Glass Desk
- Salad Spinner Speakers, Geodesic Kits, Candle-Lit Nights: How I Learned to Love the Blackout
- DIY iStand: Using Binder Clips To Make An iPhone Stand
- Lace Them Up: How to Stop Pain With Shoelaces
- Reduce Stress by Dividing Your Day into Three Operational Modes
- 18 Common Phrases to Avoid in Conversation
- The Cult of Done Manifesto
- How to Negotiate in Three Easy Lessons
- How to Identify and Learn from Your Mistakes
- Task-Killer Apps: Will They Help or Hurt Your Battery Life ?
- Greenfoot Provides a Visual Playground to Help Learn Java
- The 50 Free Apps We're Most Thankful For
- Master the New Gmail with These Tips, Shortcuts, and Add-Ons
- Googly Eyes Brighten Up German Town
- HELLO, LITTLE PRINTER - kapitalny pomysł
- Beautiful Blue World - Romanian photographer Caras Ionut imagines what our world would look like in beautiful shades of blue
- Scott Hanselman's 2011 Ultimate Developer and Power Users Tool List for Windows
- ASUS Eee Pad Transformer Prime review
- How to Mentally Prepare Yourself to Start a New Job
- Greenfoot Provides a Visual Playground to Help Learn Java
- Robotic bear pillow stops your snoring by gently mauling your face (video)
- Jak samemu szybko zrobić kolorowanki dla dzieci
- How to Deal with Family Members that Stress You Out or Drive You Crazy - to sie przyda na święta, co ? :)
- This Machine Can Tell You If Your Photos Suck Or Rule
- Zdradził? Sama jesteś sobie winna
- Yamaha V-Max Hyper Modified
- Aubade Calendriers 2010 / 2011 / 2012
- Erin Heatherton – Victoria’s Secret Lingerie Photoshoot
- Alyssa Miller – Ay Yildiz Swimwear Photoshoot
- Kelly Brook – 2011 British Fashion Awards in London
- Candice Swanepoel – Victoria’s Secret Photoshoot
- Elisandra Tomacheski – Bella Bionda Lingerie Photoshoot
- Elisandra Tomacheski – Venus Swimwear Photoshoot
- Chad White in “ILOVE” Grooming by Rosario Belmonte, photography by Matteo Felici -- no i coś dla pań :)
- Aubade Pret A Séduire AH 2011
- Aubade Lingerie AH 2011 (MQ & HQ)
- Aubade Leçons de Séduction
Friday, December 2, 2011
Rower ciemną nocą
Thursday, December 1, 2011
Monday, November 28, 2011
Przegląd prasy, czyli ciekawostki czytelnicze 14
- Rodziny ofiar wypadków drogowych powołują się na Smoleńsk
- Zapomniane niemieckie kasyno - gdy robotnicy zerwali boazerię, ich oczom ukazały się rysunki. Herby niemieckich miast, proste pejzaże, szkice produktów spożywczych. Pozostałość hitlerowskiego kasyna
- NBP szykuje zamach na przelewy ekspresowe
- Ciekawa historia pakistańskiej aktorki, która rzuciała wyzwanie mułłom
- 0 18-letniej burdelmamie
- Louise Hawson of 52 Suburbs
- Directly Install Mac OS X Lion on Your Hackintosh, No Crazy Update Process Required
- How to Be Your Own Therapist and Solve the More Manageable Problems in Your Life
- The Kinfolk Urban Expedition bag
- Stop Wasting Time Being a Perfectionist & Make More Bad Stuff
- The Expert Enough Manifesto
- A Grip Like a Vice: Grip Strength Training Tips
- Kapitalne kieliszki
- Flier, displaced by obese seatmate, forced to stand for 7 hours a myślałem, że takie historie to tylko w PKP
- The Testosterone Dilemma - Toxins, obesity, and even fatherhood could be causing a drop in testosterone
- Edison vs. Westinghouse: A Shocking Rivalry
- Occupywallstreet domains - The OWS Digital Land Grab
- Wallet Shapes & Functions
- Czy rzeczywiście mamy do czynienia z "epidemią" niepłodności męskiej?
- Google Authenticator
- Five features to look for in a carry-on bag
- Wyspiarz zbudował chatę hobbitów dla swojej rodziny za jedyne 3000 funtów
- American doctors disappointed with the results smoking ban in restaurants - The largest U.S. think tank Rand Corporation, said that the ban on smoking in restaurants, cafes and bars does not affect the number of heart attacks
- Ultrabook Features Guide
- Lenovo IdeaPad U300s review
- First Look: Pics and Official Specs of Upcoming HP Ultrabooks
- HP Folio 13 Ultrabook official
- HP Folio 13 gallery
- HP Folio 13 Ultrabook - comments
- HP Folio 13 ultrabook: 3.3 pounds, 128GB SSD, and a backlit keyboard for $900 (hands-on)
- HP Folio Ultrabook shows up early Down Under
- Dell intros slimmed-down Inspiron 13z and 14z laptops with aluminum lids, USB 3.0
- Dell XPS 14z review
- ASUS Eee Pad Transformer Prime: 10-inch Super IPS+ display, 12-hour battery and quad-core Tegra 3, ships in December for $499
- $399 HP Pavilion dm1 Hands-on: Who Needs An Ultrabook ?
- $399 HP Pavilion dm1 isn’t an Ultrabook
- Zdradził? Sama jesteś sobie winna - kobieto pamiętaj, wystarczy nie zrzędzić, smacznie gotować i dostarczać partnerowi satysfakcjonującego seksu
- This Machine Can Tell You If Your Photos Suck Or Rule
- Increase Your Dating Success with Statistics
- National Geographic Photo Contest 2011
- Siri Argument
- Robotic bear pillow stops your snoring by gently mauling your face (video)
- How to Make Waking Up Comfortable and Pleasurable (Instead of Punishing)
- How to Deal with Family Members that Stress You Out or Drive You Crazy
- Jak samemu zrobić książeczkę do kolorowania dla dziecka
- How-to: use Google Music from anywhere (yes, outside of the United States)
- What’s the Right Pillow for You?
- Lenovo ThinkPad X1 review
Tuesday, November 22, 2011
Friday, November 18, 2011
Friday, November 11, 2011
WootsonTV - Dreamland
Taka ciekawostka : na tym video, wśród uznanych gwiazd można zobaczyć polską modelkę Monikę Trzpil ... znaczy się Polki rządzą :)
Thursday, November 10, 2011
Przegląd prasy, czyli ciekawostki czytelnicze 13
- Toughstake - nowy pomysł na śledzie do piasku i śniegu
- Lenovo IdeaPad U300s review
- The Hoefman’s Little Dutch House Stays Warm with Passive Design
- Digital Photos Make For Great Memories But Crappy Photos
- Solar Backpacks That Charge Laptops!
- Tower for the Dead = czyżby przyszłość naszych cmentarzy ?
- 2011 Zombie Safe House Competition - trochę nietypowe podejście do projektowania domu :)
- Coke and WWF Turn Classic Red Soda Cans White in Honor of Endangered Polar Bears - ciekawe czy u nas też da się je kupić ?
- Nokia Unveils OLED Phone You Control by Bending - przynajmniej będę nosił spokojnie telefon w kieszeni na dupie wiedząc, że go znowu nie połamię :)
- Compact Kitchens from Kitchoo
- Artisan's at work: shoe & shirt - czyli prasowanie koszuli i pastowanie butów po samurajsku
- Irreversible Climate Change Will Occur in 5 Years if Major Infrastructure is Not Changed
- The Science Behind Tangled Earbuds - a ja nadal uważam, że to skrzaty :)
- Height Restrictions :)
- Zwiebelmarkt Eichen - pencil drawing and computer rendered
- Secret To A Long, Healthy Life: Bike To The Store
- Forgetting your beacon is manslaughter in Europe….if you wife dies in an Avalanche
- Microsoft Security Advisory: Vulnerability in TrueType font parsing could allow elevation of privileges
- Jak zrobić szlifierkę z dysku twardego?
- About MacBook Pro and SATA III Drives Compatibility
- FotoVideo.nu : Sony NEX-5N review Sony NEX-5N review
- Nikon Coolpix AW100 review
Wednesday, November 9, 2011
Przegląd prasy, czyli ciekawostki czytelnicze 12
- Rolands Sands "Hawkized" Triumph Thruxton - ślicznota :)
- 10 Upcycled Wine Bottles Turned Home Accessories
- CB Coombs Organized Chaos (DeskTops - The Best of Readers' Desks)
- How To Properly Calibrate Your New Solid State Drive
- Art Tutorial: Drink Up These Kitchen Colorants! - How To Use Coffee, Tea, and Wine To Create Works Of Art
- The FitDesk Lets You Race the Tour de Smaller Pants
- 5 Unusual Repurposed Wall Hooks
- Marleen Jansen’s See-Saw Table Explores Mealtime Manners - stoliko - huśtawka, genialna zabawka jak dziecko nie chce jeść
- Africa’s First Plastic Bottle House Rises in Nigeria
- FotoBag.no
- Cognac Nubuck Leather Weekender 2.0
- Stylizmo Blog : DIY: Pallets - czyli co ciekawego można zrobić z palet
- The million-pound mutt: Red Tibetan Mastiff becomes world's most expensive dog - czyli pies za milion funtów
- Z-Bolt Trip Wire Illuminator
- Rusza 11.Festiwal Slajdów Podróżniczych TERRA
- Nuclear powered aircraft, the Convair NB-36H a.k.a. Peacemaker
- Asus Eee Pad Transformer Prime - najciekawszy tablet tego roku
- EE Pad at Asus.com
- ITS Challenge Coin (Spy Coins Edition)
Tuesday, November 8, 2011
Przegląd prasy, czyli ciekawostki czytelnicze 11
- Alyssa Miller – Intimissimi Lingerie Photoshoot
- About that Swedish commute vs health study - correlation and causation?
- Revisiting the Panasonic 20 1.7 Micro 4/3 Lens on the Olympus E-P3
- cyclelicio.us : Specialized Source Eleven
- FIXED GEAR GIRL TAIWAN : Photo of the day
- The Phoblographer : Review: Sigma 50mm f/1.4 EX DG HSM for Canon
- Luxy Vespa Helmet
- Beatiful mountain bike wallpaper :)
- another bike wallpaper
- It's Better In The Wind - Short Film
- 2012 Nissan GT-R photos
- Classic Scarlett Johansson in Vanity Fair - bardzo ciekawa sesja
- Lego Angry Birds
- Megan Fox by Kayt Jones for ELLE China, 08/2011
- Znów zamrożenie płac w budżetówce, podwyżki akcyzy na olej napędowy i papierosy, koniec lokat antybelkowych - tak fiskus chce zaciskać pasa w przyszłym roku
- Trochę spełniłem marzenia - z Grzegorzem Turnauem rozmawia Małgorzata I. Niemczyńska
- Ojciec karmiący - o podłości kobiet walczących o dzieci
- Pani adwokat po stronie tatusiów
- Dumne śledzie - Przyklejają do swoich samochodów nalepki z napisem "Gdynia. Moje miasto" :)
- O zaletach posiadania rudych włosów
- Samsung NX11 – krótki test
- The Library Workspace
- A New Form Is All You Need To Avoid Running Injuries
- Dyskusja o Olympusie E-P3
- Żebracy pobili się w kruchcie kościoła. Są zniszczenia - o zorganizowanym cwaniactwie i naciąganiu wiernych
It's Better in the Wind
After two years of production "It's Better in the Wind" has been edited together and is now available for your viewing pleasure. A short film all about guys out on the road enjoying the two wheeled lifestyle of wrench, ride and repeat. Photographer Scott Toepfer's film was funded through the sale of his "Better in the Wind" book and we can only hope this film will make it much easier for him to find funding for many more. Here's what Scott has to say about the project...
"For the last two years I (Scott) have been taking still photographs for a personal project entitled 'It's Better In The Wind,' all the while collecting video footage from each ride as we traveled around the Western United States together.
I have been slowly editing the footage into a visual scrapbook of sorts for those who partook, and those who followed us via the web. No preaching the triumphs and failures of the motorcycle industry, no divisive commentary between manufacturers and styles...just a collection of imagery that will hopefully inspire more people to take to the road and discover what there is outside of our respective communities.
Chuck Ragan was kind enough to collaborate with me to write an original soundtrack for the film, to give me some anthemic tunes to edit with, and I can't thank him enough for the kind gesture towards a fellow traveler.
Please, enjoy the film, everybody who took part in it is family, we are all grateful for your support these past two years while we tried to build a concept around the positive nature of motorcycling."
All photographs by Scott Toepfer
Sunday, November 6, 2011
Saturday, November 5, 2011
Friday, November 4, 2011
Thursday, November 3, 2011
Przegląd prasy, czyli ciekawostki czytelnicze 10
- Underwater photography by Sarah Lee - swietne zdjecia !
- Miranda Kerr in Russell James' book
- 10 Best Netbooks In 2011
- PCMag.com : The Top 10 best netbooks
- Hands On: HP Pavilion dm1z (E-450)
- PCMag.com : HP Pavilion dm1z
- PCMag.com : Lenovo ThinkPad X120e
- Samsung NC215-A01US 10.1-Inch Solar Powered Netbook - genialne :) w końcu ktoś zrealizował moją wizję :)
- The Brazos Performance Preview: AMD E-350 Benchmarked
- forum.notebookreview.com : HP DM1z discussion
- forum.notebookreview.com : HP Pavilion dm1z Review Discussion
- engadget : HP Pavilion dm1z (with AMD Fusion) review
- Hands on with the HP Pavilion dm1z: The anti-netbook
- HP Pavilion DM1Z Review
- The Evolution of the Pavilion dm1
- 9 Amazing Bags Available Now
- SQUARE1 HOLDALL / CAMPFIRE BAG
- Killspencer : Classic Black Weekender
- Dear Christianity: An Apology
- Men's Bags 2011
- Power poses to win in the boardroom
- Test Dell Vostro V131
- Laptop do pracy w terenie – jaki kupić?
- Road Test – Millican’s Keith the Writers Bag
- Buyers Guide: 9 Amazing Bags Available Now
- Cycling safely in Amsterdam
- Mind & Brain : What You Don't Know Can Kill You
- The fashionable cyclist: Why let a little rain get you down?
- Best Netbook Computers 2011 – Specs, Reviews, Comparisons, and Buying Guides
- kwejk.pl : Najciekawsze uwagi z dzienniczków uczniowskich
- Effects of Male Masturbation on Attracting Women
- The Problem of Pornography
- Masturbation In Marriage: Part I
- Redefining Fidelity
- Marriage and Pornography: The Experts’ Take
- How to Use Philosophy as a Personal Operating System: From Seneca to Musashi
- simplemarriage.net : Ahem, let’s talk about the M word
- Kobieta po przejściach i mężczyzna z przyszłością
- Piraci, blogerzy i e-11 września - prof. Lessig dla POLITYKI
- +1 For Fathers
- Trash Messenger Bag
- Gallery of Trash Messenger Bags
- New Cycling Initiatives in Ukraine - The city of Lviv in western Ukraine has begun a 9-year initiative to build 168 miles of bicycling infrastructure to the region - to więcej niż w całej Polsce rocznie - pozostawiam bez komentarza
- Steven Alan shop (bags etc)
- allegro.pl : Dell Vostro V131, i5, 8GB, Dysk SSD 128 GB
- Dell Vostro V131: Thin and powerful laptop for small businesses
- business Iron Man velocity measurement. Dell Vostro V131 ??? Dell Vostro V131 the first to test
- Test Dell Vostro V131 notebook
- allegro.pl : DELL V131 13,3' I5-2410 4GB 128GB SSD W7Pro64 3G - 3599 PLN
- 60 Popular Pieces of False Knowledge
- enric adrian gener underwater photos
- Glenn Jones - A growing collection of designs created for online t-shirt store www.glennz.com
- Bert & Ernie tries Gangsta-Rap - kapitalnie zrobione :)
- Ben Watts shoots for the 2nd Issue of treats! magazine part 1 ;)
- Ben Watts shoots for the 2nd Issue of treats! magazine part 2 :)
- Ben Watts shoots for the 2nd Issue of treats! magazine part 3 :)
- Alcohol as a recovery drink
Tuesday, November 1, 2011
Przegląd prasy, czyli ciekawostki czytelnicze 09
- How the characters from the Angry Birds video game would look in the real world
- Pepsi used the remains of aborted babies for their products
- House Rules Vinyl Wall Stickers
- Nine Life Lessons Learned From Hunter S. Thompson’s Viral Legacy
- Katarina Ivanovska – Victoria’s Secret Lingerie Photoshoot
- 10 Funny/Rude Replies & Sayings Coming From Siri
- 10 Funny/Rude Replies & Sayings Coming From Siri - Part 2
- flickr: michael sweet's photostream - mnostwo zdjęć z oceanem i plazami
- antraxw gallery on deviantart.com
- kapitalny loft w starym mlynie
- Would You Buy a 10 Foot Wide Home for $849,000?
- Jeep Jeepster Commando Convertible
- Miranda Kerr Rag & Bone Photoshoot
- Electric DeLoreans Coming In 2013
- The Difference Between Married Men And Married Women
- 7 kroków Akceptacji Siebie przez duże S
- Burzowe chmury poczucia winy
- Jak skonstruowane jest EGO?
- Myśli i obserwacje
- Poczucie bezsilności i braku energii, a granie fałszywej roli ofiary
- Podstawowe pułapki EGO
- Win Hearts, Not Arguments
- 20 Ways to Eliminate Stress From Your Life
- The Sony NEX-7 Digital Camera Review by Steve Huff
- I just want to be happy
- 6 Signs You Are Stuck in a Bad Marriage
- Procrastination Rewards
- Oracle Performance and Backup blog
- Po prostu puść to, technika uwalniania – Mooji
- 17 nienaruszalnych praw kobiet - bardzo prawdziwe
- Problem jaki nauka ma z religią - mądre
- Z serii Polka potrafi czyli nie ma głupich pytań
- O ideałach w życiu
- Wolfram Aplha Secure Password Generator
- 10 Rules For Being Human - bardzo mądre
- Dell Vostro v131 - what win services to stop for SSD
- bepreparedtosurvive.com : Modyfying your gear
- Recenzje Notebookcheck.pl : dyskusja nad testem laptopa Samsung 350UA
- Top 10 ultraportable laptops
- zdnet.co.uk : Dell Vostro V131 review
- allegro.pl : Dell Vostro 3350 i5-2410M 4G 500G USB3.0 NBD złoty
- allegro.pl : DELL V131 13,3' I5-2410 4GB 128GB SSD W7Pro64 3G
- forum.notebookreview.com : Dell Vostro V131 discussion
- konfiguracje V131 do nabycia od reki
- notebookcheck.com : HP Pavilion dm1z
- FrontArmy.com : HERE IS A SABINE WALLPAPER
- Rearrangeable Pop-Up Garden Shed
- MensHealth.pl : Oczy szeroko otwarte - czyli o efektach niedosypiania
- Kobieta PRL. 30 lat później - kapitalny eksperyment
- Szkoła ważnych ludzi - reportaż o liceach, które kosztują od 20 do 60 tys. zł rocznie
- Diabeł w dom - o zmianach w strefie Gazy po przejęciu władzy przez Hamas
- Habemus Stuhrum - z aktorem i reżyserem, Jerzym Stuhrem, rozmawia Małgorzata I. Niemczyńska
- Do Couples in Second Marriages Learn from Mistakes of the First?
- Szybka kolej z Lublina do Warszawy
- Akcja GW : obwodnica dla Kołbieli - szybszy przejazd "lubelską" do Wwy
- Parę mądrych słów o naprawianiu ludzi wokół nas
- Facet zaczyna się od 2,5 tysiąca
- Listen to the “Good” Feedback at Work (when one person said something critical, you obsessed about that comment for days and ignored all of the positive feedback)
- Why Adversity Can Lead to Profit - mądre, polecam
- 29 Reasons Stopping You Moving Forward
- Sheriff Chuck Wright Doesn’t Hold Back: Time For Citizens To Arm Themselves
Blur Menu with CSS3 Transitions
There are so many great things we can do with the additional properties and possibilities that CSS3 brings along. Today I want to show you how to experiment with text shadows and with transitions in order to achieve a blur effect that we’ll apply to a menu on hovering over the elements. The main idea is to blur the other items while enhancing the one we are currently hovering.
The images in the demos are by fabulous Mark Sebastian and they are licensed under the Attribution-ShareAlike 2.0 Generic (CC BY-SA 2.0) License. Visit Mark’s Flickr Photostream or his website to discover some beautiful photography.
Please note that this will only work properly in modern browsers and unfortunately Internet Explorer does not belong to that category yet since it does not support transitions (and many other suggested CSS3 properties that others do support). It also does not support text-shadows, so I’ve added a additional stylesheet for IE which will at least show the menu elements.
The Markup
Let’s create the HTML structure for our menu first. We’ll add it to a container with a fixed width. The menu is going to look as follows:
<ul class="bmenu">
 <li><a href="#">About</a></li>
 <li><a href="#">Illustrations</a></li>
 <li><a href="#">Photography</a></li>
 <li><a href="#">Web Design</a></li>
 <li><a href="#">Personal Projects</a></li>
 <li><a href="#">Contact</a></li>
</ul>
Now we’ll add some style!
The CSS
In almost all of our examples we’ll have the same style for the ul and for the list elements. Just the link element will be modified. So, the common style for the unordered list is the following:
.bmenu{
    padding: 0px;
    margin: 0 0 10px 0;
    position: relative;
}
.bmenu li{
    font-size: 50px;
    display: block;
}
Now, let’s take a look at each of the seven examples.
Example 1
In the first example we want to show the menu items slightly blurred initially. For that, we’ll give the link elements transparent color and a white text-shadow. We’ll also add the transitions for all properties:
.bmenu li a{
 color: transparent;
 display: block;
 text-transform: uppercase;
 text-shadow: 0px 0px 5px #fff;
 letter-spacing: 1px;
 -webkit-transition: all 0.3s ease-in-out;
 -moz-transition: all 0.3s ease-in-out;
 -o-transition: all 0.3s ease-in-out;
 -ms-transition: all 0.3s ease-in-out;
 transition: all 0.3s ease-in-out;
}
When hovering over a link element, we want it to become “clear” and all the others should become blurry. Now, we cannot say “on hover of a particular element do x to all the siblings” in CSS because the sibling selector is not really a sibling selector, it will just give you the next siblings in the HTML.
Anyway, we can do a little trick here. Since we have all our items nicely laid out as block elements, we can simply say, make everything blurry when we hover the whole menu (the unordered list) and then when hovering over a specific item we’ll crisp it up:
.bmenu:hover li a{
 text-shadow: 0px 0px 5px #0d1a3a;
}
.bmenu li a:hover{
 color: #fff;
 text-shadow: 0px 0px 1px #fff;
 padding-left: 10px;
}
By adding a padding left, we’ll animate the currently hovered item a bit to the right.
Example 2
In the second example, we’ll show the items in the menu a bit skewed initially. We’ll do that with the 2D transforms property skew. The value will be -12 degrees which is the skewing angle along the x axis. The link s will have a semi-transparent background that we’ll achieve by using an rgba value. We’ll also add a slighty transparent text-shadow using rgba:
.bmenu li a{
 display: block;
 text-transform: uppercase;
 text-shadow: 1px 1px 2px rgba(89,22,20,0.3);
 color: #581514;
 padding: 5px 20px;
 margin: 2px;
 background: rgba(255,255,255,0.2);
 letter-spacing: 1px;
 -webkit-transform: skew(-12deg);
 -moz-transform: skew(-12deg);
 -o-transform: skew(-12deg);
 -ms-transform: skew(-12deg);
 transform: skew(-12deg);
 -webkit-transition: all 0.4s ease-in-out;
 -moz-transition: all 0.4s ease-in-out;
 -o-transition: all 0.4s ease-in-out;
 -ms-transition: all 0.4s ease-in-out;
 transition: all 0.4s ease-in-out;
}
Hovering over the menu, we’ll change the skew angle to 0 and make them appear blurry with a semi-transparent background. The currently hovered link will have no background:
.bmenu:hover li a{
 color: transparent;
 text-shadow: 0px 0px 10px #fff;
 background: rgba(88,22,22,0.2);
 -webkit-transform: skew(0deg);
 -moz-transform: skew(0deg);
 -o-transform: skew(0deg);
 -ms-transform: skew(0deg);
 transform: skew(0deg);
}
.bmenu li a:hover{
 background: transparent;
 text-shadow: 1px 1px 10px rgba(89,22,20,0.6);
 color: #581514;
}
Example 3
In the third example we will play a bit with the sizes of the elements. We’ll initially scale them down and blur them. We’ll use a fairly slow linear transition:
.bmenu li a{
 white-space: nowrap;
 color: transparent;
 display: block;
 text-transform: uppercase;
 text-align: center;
 text-shadow: 0px 0px 6px #fff;
 letter-spacing: 1px;
 -moz-transform: scale(0.5);
 -ms-transform: scale(0.5);
 -o-transform: scale(0.5);
 -webkit-transform: scale(0.5);
 transform: scale(0.5);
 -webkit-transition: all 0.6s linear;
 -moz-transition: all 0.6s linear;
 -o-transition: all 0.6s linear;
 -ms-transition: all 0.6s linear;
 transition: all 0.6s linear;
}
Hovering over the menu, well blur the items even more and the currently hovered element will be sharpened up and scaled to the original size:
.bmenu:hover li a{
 text-shadow: 0px 0px 15px #fff;
}
.bmenu li a:hover{
 text-shadow: 0px 0px 1px #fff;
 -moz-transform: scale(1);
 -ms-transform: scale(1);
 -o-transform: scale(1);
 -webkit-transform: scale(1);
 transform: scale(1);
}
Example 4

In this variation, we’ll give the link elements a semi-transparent black background and a vibrant orange text color. We’ll use the linear timing transition function here:
.bmenu li a{
 display: block;
 text-transform: uppercase;
 text-shadow: 0px 0px 2px #eeb213;
 color: #eeb213;
 padding: 5px 20px;
 margin: 2px;
 background: rgba(0,0,0,0.7);
 letter-spacing: 1px;
 -webkit-transition: all 0.2s linear;
 -moz-transition: all 0.2s linear;
 -o-transition: all 0.2s linear;
 -ms-transition: all 0.2s linear;
 transition: all 0.2s linear;
}
When we hover, we want the menu items to blur and and also to make their backgrounds more transparent. A single hovered item will become more opaque:
.bmenu:hover li a{
 text-shadow: 0px 0px 10px #eeb213;
 color: transparent;
 background: rgba(0,0,0,0.2);
}
.bmenu li a:hover{
 background: rgba(0,0,0,1.0);
 text-shadow: 0px 0px 1px #eeb213;
}
Example 5
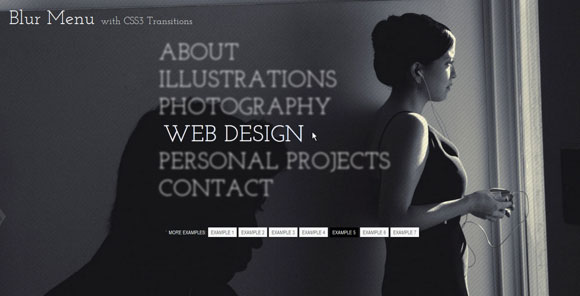
The fifth example will be a subtle one: we’ll use only white for the text-shadows and font colors and just blur the elements slightly:
.bmenu li a{
 color: transparent;
 display: block;
 text-transform: uppercase;
 text-shadow: 0px 0px 4px #fff;
 letter-spacing: 1px;
 -webkit-transition: all 0.2s ease-in-out;
 -moz-transition: all 0.2s ease-in-out;
 -o-transition: all 0.2s ease-in-out;
 -ms-transition: all 0.2s ease-in-out;
 transition: all 0.2s ease-in-out;
}
On hover we’ll blur a little more and crisp up and move the currently hovered link element a bit:
.bmenu:hover li a{
 text-shadow: 0px 0px 6px #fff;
}
.bmenu li a:hover{
 color: #fff;
 text-shadow: 0px 0px 1px #fff;
 padding-left: 10px;
}
Example 6

In this example we’ll give the elements a semi-transparent white background and leave them crisp initially:
.bmenu li a{
 white-space: nowrap;
 display: block;
 text-transform: uppercase;
 text-shadow: 1px 1px 2px rgba(71,80,23,0.3);
 color: #fff;
 padding: 5px 20px;
 margin: 2px;
 background: rgba(255,255,255,0.2);
 letter-spacing: 1px;
 -webkit-transition: all 0.4s ease-in-out;
 -moz-transition: all 0.4s ease-in-out;
 -o-transition: all 0.4s ease-in-out;
 -ms-transition: all 0.4s ease-in-out;
 transition: all 0.4s ease-in-out;
}
We want to give the first and last element some rounded borders so that the menu looks like a neat unit. We’ll target our desired elements with the first-child and last-child selectors:
.bmenu li:first-child a{
 -webkit-border-radius: 15px 15px 0px 0px;
 -moz-border-radius: 15px 15px 0px 0px;
 border-radius: 15px 15px 0px 0px;
}
.bmenu li:last-child a{
 -webkit-border-radius: 0px 0px 15px 15px;
 -moz-border-radius: 0px 0px 15px 15px;
 border-radius: 0px 0px 15px 15px;
}
On hover, we want the elements to look blurry and the currently hovered element to change colors and have a transparent background:
.bmenu:hover li a{
 text-shadow: 0px 0px 10px #fff;
 color: transparent;
}
.bmenu li a:hover{
 background: transparent;
 text-shadow: 1px 1px 10px rgba(71,80,23,0.6);
 color: #c4d85a;
}
Example 7
In the last experiment we’ll make the whole menu look like a circle by adding a border radius with the value of half of the menus width/height:
.bmenu{
 padding: 50px 0px;
 margin: 0 auto;
 position: relative;
 background: rgba(0,0,0,0.7);
 width: 500px;
 height: 400px;
 -webkit-border-radius: 250px;
 -moz-border-radius: 250px;
 border-radius: 250px;
 -webkit-transition: background-color 0.5s ease-in-out;
 -moz-transition: background-color 0.5s ease-in-out;
 -o-transition: background-color 0.5s ease-in-out;
 -ms-transition: background-color 0.5s ease-in-out;
 transition: background-color 0.5s ease-in-out;
}
We’ll add the transitions here because we want to animate the background color when we enter into the menu. We’ll make it more transparent by using rgba values:
.bmenu:hover{
 background: rgba(0,0,0,0.2);
}
We’ll adjust the font size and the line height of the list element a bit:
.bmenu li{
 font-size: 40px;
 display: block;
 line-height: 66px;
}
The elements will be scaled down and blurred:
.bmenu li a{
 white-space: nowrap;
 color: transparent;
 display: block;
 text-align: center;
 text-transform: uppercase;
 text-shadow: 0px 0px 3px #fff;
 letter-spacing: 1px;
 -moz-transform: scale(0.8);
 -ms-transform: scale(0.8);
 -o-transform: scale(0.8);
 -webkit-transform: scale(0.8);
 transform: scale(0.8);
 -webkit-transition: all 0.4s linear;
 -moz-transition: all 0.4s linear;
 -o-transition: all 0.4s linear;
 -ms-transition: all 0.4s linear;
 transition: all 0.4s linear;
}
Hovering over the menu will also make the elements more blurry and give the currently hovered one a nice background color while crisping it up and scaling it to its original size:
.bmenu:hover li a{
 text-shadow: 0px 0px 10px #fff;
}
.bmenu li a:hover{
 text-shadow: none;
 color: #fff;
 background: rgba(129,6,29,0.8);
 -moz-transform: scale(1);
 -ms-transform: scale(1);
 -o-transform: scale(1);
 -webkit-transform: scale(1);
 transform: scale(1);
}
Remember, IE is the party pooper here, but if you’d like to try your luck and use IE’s proprietary shadows, check out the following resources and go wild:
CSS Blurred Text-Shadow in IE — Part I
IE Visual Filters and Transitions Reference: Static Filters
And that’s it! What’s your favorite one? I hope you like these experiments and find them inspiring!
Share and Enjoy:


